This content has been moved from Qiita.
Let’s use Let’s Encrypt with Sakura Cloud Web Accelerator.
Update (2021/01/29)
The Web Accelerator now has an auto-renewal feature for Let’s Encrypt, so there’s no need for the following efforts anymore! 🎉
- Announcing Automatic Renewal of Let’s Encrypt Certificates on Web Accelerator
- Using Automatic Renewal Certificates for Let’s Encrypt on Web Accelerator
Overview
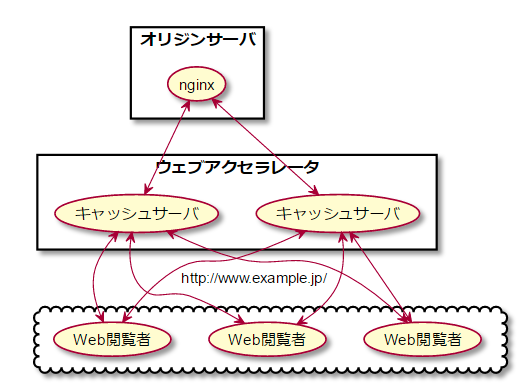
When using a custom domain with Sakura Cloud Web Accelerator, you can enable SSL (including HTTP2 support) by installing an SSL certificate. Here’s how I used a Let’s Encrypt certificate.
Steps
- Issue a certificate with Let’s Encrypt
- Register the SSL certificate via API
Prerequisites
- Web Accelerator is already set up with a custom domain
- The origin server is assumed to be running nginx
Current Status
- Nginx configuration on the origin server
server {
    listen       80;
    server_name  www.example.jp;

    location / {
        root /usr/share/nginx/html;
        index index.html;

        add_header Cache-Control s-maxage=3600;
    }

    error_page   500 502 503 504  /50x.html;
    location = /50x.html {
        root   /usr/share/nginx/html;
    }
}
- The origin server content is cached for one hour (3600 seconds)
Preparing to Issue a Certificate with Let’s Encrypt
Setting Up the Certificate Issuing Tool
The official tool is certbot, but it requires installing Python and can be cumbersome, so we’ll use a Go-based tool called lego.
https://github.com/xenolf/lego/releases
Pre-built binaries are available, so let’s use those.
- Download (for 64-bit Linux in this case)
# curl -L -O https://github.com/xenolf/lego/releases/download/v0.3.1/lego_linux_amd64.tar.xz
# tar xvf lego_linux_amd64.tar.xz
- Test the command
# cd lego
# ./lego --version
We’ll use the lego command with the webroot method (placing domain verification files in a specified directory for verification) to check domain ownership and issue the certificate.
Files and Cache for Domain Verification
To prevent the domain verification files from being cached by the Web Accelerator, we’ll adjust the nginx configuration.
The domain verification files need to be placed under the document root in /.well-known/, so we’ll separate the location to ensure it isn’t cached.
server {
    listen       80;
    server_name  www.example.jp;

    location / {
        root /usr/share/nginx/html;
        index index.html;

        add_header Cache-Control s-maxage=3600;
    }

    location /.well-known/ {
        root /usr/share/nginx/html;
        index index.html;
    }

    error_page   500 502 503 504  /50x.html;
    location = /50x.html {
        root   /usr/share/nginx/html;
    }
}
The Web Accelerator won’t cache content unless Cache-Control includes s-maxage.
Issuing the Certificate with lego
# ./lego --path ./ --webroot /usr/share/nginx/html/ --email hoge@example.jp --domains www.example.jp --accept-tos run
If successful, the certificate and private key will be in the certificate directory.
| File Name | Content |
|---|---|
| www.example.jp.crt | Server certificate and intermediate certificate |
| www.example.jp.key | Private key |
These server and intermediate certificates should be registered with the Web Accelerator to enable SSL.
Registering the Certificate with Web Accelerator via API
While you can register SSL certificates through the control panel, using the API allows for easier automation in the future.
Update (2017/12/21): The official API has been released, making updates secure and reliable!
Web Accelerator Service Update Announcement
First, obtain an API token for Sakura Cloud. For more information about Sakura Cloud API, refer to the following:
- Getting Started with Sakura Cloud API for Infrastructure Engineers
- Sakura Cloud API Documentation
- Web Accelerator Public API
Register the certificate via API
# curl -X POST --user "Access Token":"Access Token Secret" \
https://secure.sakura.ad.jp/cloud/zone/is1a/api/webaccel/1.0/site/<SiteID>/certificate \
-d "{\"Certificate\": { \"CertificateChain\": \"$(perl -pe 's/\n/\\n/' certificates/www.example.jp.crt | perl -pe 's/\\n$//')\", \"Key\": \"$(perl -pe 's/\n/\\n/' certificates/www.example.jp.key | perl -pe 's/\\n$//')\" }}" | jq .
- Replace the API token,
, and certificate file names as appropriate.
Once registered successfully, accessing https://www.example.jp/ should display the site using the Let’s Encrypt certificate.
Finally
Automating SSL certificate renewal with Let’s Encrypt and Sakura Cloud API seems feasible.
The following commands should suffice to renew the certificate easily.
# ./lego --path ./ --webroot /usr/share/nginx/html/ --email hoge@example.jp --domains www.example.jp --accept-tos renew
# curl -X PUT --user "Access Token":"Access Token Secret" \
https://secure.sakura.ad.jp/cloud/zone/is1a/api/webaccel/1.0/site/<SiteID>/certificate \
-d "{\"Certificate\": { \"CertificateChain\": \"$(perl -pe 's/\n/\\n/' certificates/www.example.jp.crt | perl -pe 's/\\n$//')\", \"Key\": \"$(perl -pe 's/\n/\\n/' certificates/www.example.jp.key | perl -pe 's/\\n$//')\" }}" | jq .